Lenses are worth every penny we spend. Good glass cannot be substituted (probably just ticked off some Holga and Lomo fans, but i don't care). Doesn't everyone drool just a little bit when you hear the word Profoto? However, sometimes, just sometimes, you have a hard time convincing yourself to get out your wallet and buy the gear. Radio transmitters are just a few dollars worth of plastics and electronics, right? $40.00 dollars for Tupperware® over your flash? $200.00 plus for light panels (isn't it really just semi-transparent, high-quality fabric and some molded plastic or aluminum framing?).
I decided to build a couple of them to decide for myself.

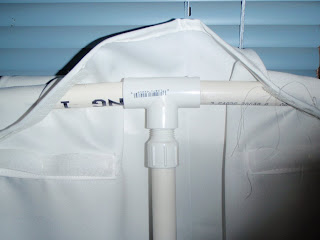
The PVC is all 1/2" and no individual component is longer than around 30". This means i can tear it down and set it up easily, and its is very travel worthy.
PVC and all connector pieces was procured from a local hardware store for $12.00.
10' 1/2" lengths x3
1/2" "T" adapter x4
1/2" female threaded adapter x2
1/2" male threaded adapter x6

All pipes were cut (vice and hacksaw) to proper sizing and connector pieces were adhered with standard PVC cement (i had this on hand already, but can be found anywhere PVC is sold for just a few dollars).
The fabric is white satin from a local fabric store. It was on sale @ 30%. $22.00 before tax.
72x60" x2
I used Velcro (purchased from the fabric store) and quilt binding as a backing for the Velcro to reinforce the satin. This should help prevent any tearing of the satin from repetitive "Velcro action".
3yds Velcro @ $11.00
6yds quilt binding @5.50

The short (cut) ends of the satin needs to be hemmed so it will not fray. The hook (hard) side of the Velcro is stitched onto the hemmed edge with the quilt binding underneath. The loop (soft) side is stitched 5" in from the hemmed edge with quilt binding under. This 5" allowance provides room for the 1/2" PVC.
The PVC assembles in an "I" formation. A center post provides easy attachment for a support system. I used a Manfrotto Super Clamp with Manfrotto Magic Arm.
All materials purchased for this project totaled less than $60.00
As an afterthought, color coding the appropriate connectors and PVC pipes will allow for quick assembly. Colored electrical tape or a multicolor permanent marker set would work perfectly.
Here are a few shots using the new panels.


For the record, they do work pretty well. I have used many great products over the years and have found very few DIY products that compare to quality built photographic product. At the very least, the value gained in building something yourself is lost when you have to repair or rebuild it because of wear and tear.
This was a fun project and I already have ideas for modifying it to be more versatile. I will keep you posted...
No comments:
Post a Comment